Showing posts with label lens. Show all posts

Apr 9, 2011

Rollei

German manufacturer of optical goods founded in 1920 by Paul Franke and Reinhold Heidecke in Braunschweig, Lower Saxony, and maker of the Rolleiflex and Rolleicord series of cameras. Current products also include specialty and nostalgic type films for the photo hobbyist market.

Grand Prix for the twin-lens Rolleiflex

The twin-lens Rolleiflex was awarded the Grand Prix at the World Exhibition in 1937. The boom in the sales of this latest versions of which delighted professionals and amateurs alike, was only interrupted by the Second World War. Who was this Reinhold Heidecke really who designed such an ingenious product? Heidecke was the type of person who knew how to combine in the best possible way the characteristics of an entrepreneur, who was prepared to take a risk, with the vast store of experience of a camera constructor. It was clear to him from the very beginning that such an ingenious idea can only grow naturally if all the conditions necessary for this are available. Heidecke's philosophy was the precise and high-quality transformation of an idea. This contributed just as much to its of the art marketing as its inherent spirit and technical state Heidecke was, however, not just an ingenious constructor, who set great store by the transformation of his ideas. At the same time, he was his own most critical customer. Professional and amateur photographers came across him at all the "photographic focal points" of the world. A passionate photographer, he popped up all over the place, and everyone's eyes were upon him. For Heidecke never travelled with a camera from the normal production programme, and was always trying out new developments or improvements.

Rolleiflex MiniDigi 


The MiniDigi AF 5.0 is a three-inch high, fully functional digicam replica of the original classic twin reflex camera.Rolleiflex introduced the original MiniDigi in 2006, but it quickly sold out. The new MiniDigi AF 5.0, which is is available with a red or black casing, has been given some significant performance upgrades, including a 5 MB image file from a 3MP CMOS sensor, autofocus, and a very clear 1.1 inch TFT monitor, located at the top of the camera as it is on the full-sized Rolleiflex TLR.It's available through specialty retailers. Pricing is expected to be $399 MSRP.A nostalgic design feature that has modern applications is the square format. The square format means no need to choose between horizontal or vertical position. You simply look downward into the viewfinder at waist level, aim, and shoot.

Rollei 35B
 
The 35B is the basic, low-cost model. Instead of the battery-operated CdS meter of its more expensive siblings, it uses a selenium "solar cell" meter which supplies its own electricity. So you don't need batteries. And given that mercury batteries are outlawed, that's most probably a good thing.
Unfortunately the Rollei 35B uses a lower-cost Triotar lens and a modified shutter system. So it's a bit more basic than a regular 35. Still, it's a gorgeous camera, especially in the mint black finish that I found this unit in.
The quirks of the Rollei 35 series are well known. The rewind dial and the flash bracket are located on the bottom of the camera. The button by the flash shoe is the rewind release button. Interestingly, on the top of the lens is the scale-focus in feet, on the bottom is the scale-focus in meters. I'm assuming you could ask a repair-person to flip the two around, depending on your preference.
Although we think of the Rollei 35 as pretty compact, compare it against the 1939 Kodak Retina I - made almost 30 years previously. I have a page extensively comparing all of the 35mm Compact Cameras of the 1960s and 1970s.


Specifics


meter center-weighted, spot and multi-spot meter in body
shutter electronically-controlled 30 to 1/500th of a sec, 1/3 stop increments, up to 1/1000th with some lenses, longer times with expensive auxiliary equipment
film transport built-in motor drive
handholding easy with action grip
engineering electronic mechanisms that never need adjustment, but fail catastrophically
battery constant reliance on custom NiCd pack
changing backs brilliant dark slide design
changing film drop-in inserts
resale value fair
automatic exposure aperture, shutter and program AE
film backs 6x6, 6x4.5 horizontal 120 and 220 backs, 6x6 70mm, 70mm databack and Polaroid back
viewfinder info full information; f-stop and shutter speed to 1/3 stop, reminders of mexter mode, meter lock and exposure compensation, flash ready light and battery low indicator
service 48 hours in New Jersey
film ISO->meter coupling film backs keyed with ISO data, exposure adjusts automatically
lens/camera coupling electronic, so macro accessories are simple and preserve automation
documentation sketchy owner's manual
appearance modern, clunky workhorse
"take my picture" can lend camera to novice for a few shots and expect good results
lenses Zeiss lenses from 40mm to 500mm, Schneider 60, 80/2, 150 fixed, 75-150, 140-280 zooms, 55 perspective control, 2x teleconverter
renting lenses good luck
filters Very restricted choice of bayonet or 67mm with adaptor
price terrifyingly expensive


Apr 7, 2011

Authentic Photo


Pinhole Photography

Pinhole Photography
A pinhole camera is created using a small box with a tiny hole, the overall form is extremely simple with no lens. DIY pin hole cameras are often made from shoe boxes and photographic paper.

Cross Processing

Cross Processing
Cross processed photographs are recognisable from the unusual colours and tones in the final shot. The effect was originally produced from developing the photographic film using the wrong mix of chemicals. Nowadays, a cross processed style can be simply achieved in just a few steps.

Street Photography

Street Photography
One of the most recognisable street photography shots is ‘Homeless Mike’ by Leroy Skalstad. The gritty, high contrast style of the image really emphasises the nature of street life.

Split Toning

Split Toning
The technique of split toning was originally developed from the printing process of a photographic image, using various toners to produce a subtle, multi-tone effect to the final photograph.

Rock Photography

Rock Photography
Although not quite a photo effect itself, the style of rock photography has become a recognised approach to creating portraits of long haired rockstars.

The Dave Hill Look

The Dave Hill Look
Professional photographer Dave Hill has become highly acknowledged for his unique style of post-processing that gives a very strong and impactful effect to his portrait images.

Lomo Photography

Lomo Photography
The Russian made Lomo LC-A camera was manufactured a cheap alternative to the higher quality Japanese rivals. It was poorly made and the photographs it produced were just as bad, however as time passed popular culture brought the mis-coloured shots from the Lomo camera into a whole new light, which is now a very sought after effect.

Infrared Photography

Infrared Photography
Infrared film used alongside an infrared filter allows the camera to block out the usual spectrum of light, allowing only infrared light to expose the film. The result is a false colour or black and white effect, the effect is particularly stunning with shots of foliage, where the reflections from leaves and grass are made visible and give the impression of a dream-like scene.

The Velvia

The Velivia Effect
Fujifilm Velvia film created highly saturated, largely contrasting and extremely sharp images, which made it particularly popular with nature and landscape photographers.

Dark Grunge Photo

Grunge Photo Effect
The term grunge has evolved from the music genre also known as Seattle Sound, characterized by stripped down sounds and heavily distorted guitars. The term grunge also made its way into photo post processing, where the key features are muted colours and large areas of texture and grain.

HDR Photography

HDR Photography
High Dynamic Range Imaging is a photography technique that produces an image with a much larger range of luminance between the darkest and lightest areas, making it much closer to the spectrum seen by the human eye. More recently the effect has been pushed to the max, with heavy tone mapping producing an abstract and highly stylised photo effect.

Soft Focus Photography

Soft Focus Photography
The effect produced by soft focus photography is actually the result of a flaw in the lens, although lenses with a specific soft focus feature have since been produced. Soft focus lenses create a slightly blurred image that retains sharp edges, often described as a dreamy or glamourous style.

Movie Photo

Movie Photo Effect
Alongside post processing, the video filming of movies often involves a range of camerailters.

Tilt Shift Photography

Tilt Shift Photography
Tilt Shift is a photographic technique where the image plane is rotated, giving a very shallow depth of field but maintaining sharpness in a specific area of the shot. One of the popular post processing effects related to tilt shift photography is known as miniature faking, where the depth of field manually added to a shot gives the illusion of tiny model figures and sceneries.

copywriting from  www.blog.spoongraphics.co.uk 

Mar 31, 2011

NIKON

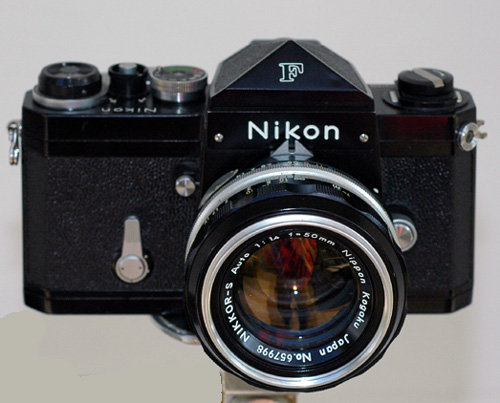
Founded in 1917 as Nippon Kōgaku Kōgyō Kabushikigaisha, the company was renamed Nikon Corporation, after its cameras, in 1988. The name Nikon, which dates from 1946, is a merging of Nippon Kōgakuand an imitation of Zeiss's brand Ikon. This would cause some early problems in Germany though as Zeiss complained that Nikon violated its trademarked camera, the "Ikon" and so from 1963 to 1968 Nikon F's in particular were labeled as 'Nikkor'.
The Nikkor brand was introduced in 1932, a Westernized rendering of an earlier version Nikkō, an abbreviation of the company's original full name. 
Digital photography
Nikon D1 1999
Nikon created some of the first digital SLRs (DSLRs) as research projects for NASA in 1991. After a 1990s partnership with Kodak to produce digital SLR cameras based on existing Nikon film bodies, Nikon released the Nikon D1 SLR under its own name in 1999. Although it used an APS-C-size light sensor only 2/3 the size of a 35 mm film frame, the D1 was among the first digital cameras to have sufficient image quality and a low enough price for some professionals  to use it as a replacement for a film SLR. The company also has a Coolpix line which grew as consumer digital photography became increasingly prevalent through the early 2000s.
Through the mid-2000s, Nikon's line of professional and enthusiast DSLRs and lenses including their back compatible AF-S lens line remained in second place behind Canon in SLR camera sales, and Canon had several years' lead in producing professional DSLRs with light sensors as large as traditional 35 mm film frames. All Nikon DSLRs from 1999 to 2007, by contrast, used the smaller DX size sensor. 
Nikon F 1959
Film camera
Once Nikon introduced affordable consumer-level DSLRs such as the Nikon D70 in the mid-2000s, sales of its consumer and professional film cameras fell rapidly, following the general trend in the industry. In January 2006, Nikon announced it would stop making most of its film camera models and all of its large format lenses, and focus on digital models. Nevertheless, Nikon is the only major photo camera manufacturer still making film SLRs. The remaining model is the professional Nikon F6 with the last amateur model, FM10, having been discontinued. 
Compact cameras 
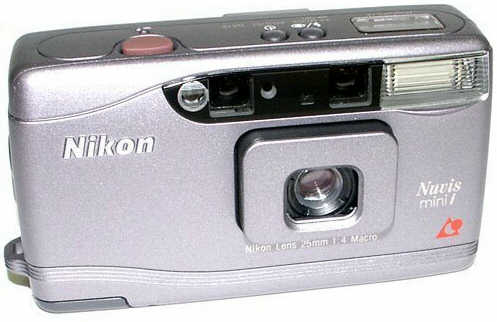
Nikon Nuvis
Between 1983 and the early 2000s a broad range of compact photo cameras were made by Nikon. Nikon first started by naming the photo cameras with a series name (like the L35/L135-series, the RF/RD-series, the W35-series, the EF or the AW-series. In later production cycles, the photo cameras were double branded with a series-name on the one and a sales name on the other hand. Sales names were for example Zoom-Touch for cameras with a wide zoom range, Lite-Touch for ultra compact models, Fun-Touch for easy to use photo cameras and Sport-Touch for splash water resistance. After the late 1990s, Nikon dropped the series names and continued only with the sales name. Nikon's APS-cameras were all named Nuvis.
The photo cameras came in all price ranges from entry-level fixed-lens-cameras to the top model Nikon 35Ti with titanium body and 3D-Matrix-Metering.

 information from wikipedia.org


Mar 26, 2011

PHOTO LESSONS : Camera basics

All photo cameras from the simplest to the highest of high tech share some basic features.
Lens. The lens is made up of layers of glass which are each shaped to focus incoming light onto a surface used to expose the image.
Light sensitive medium. In digital photo cameras this is a sensor – which comes in a variety of types but all basically change light into an electrical signal. In film cameras, the exposure takes place on, you guessed it, film.
A variably sized hole call the aperture. Located in the lens, the aperture control is a series of blades which changes the amount of light passing through lens. The aperture’s basic unit of measurement for how much light is getting through is the “ƒ Stop.” A whole Stop change in aperture lets in either half as much light or twice as much light. On your lens (or in the view finder, or maybe on an LCD menu on your camera) you typically see numbers like ƒ1.8, ƒ2.8, ƒ4, ƒ5.6, ƒ8, ƒ11, ƒ16, and ƒ22. These are whole Stops which, as previously explained, lets in twice as much or half as much light compared to the Stop beside it.
 A shutter which limits how much time light is allowed to enter your light-tight box. The measurement for the shutter is the “shutter speed,” also known as Stops, which is measured in fractions of a second like 1/30th, 1/60th, 1/125th, 1/250th, 1/500th and so on. You can see a little easier how each might vary the exposure by either half as much light, or twice as much. Exposure times can also vary from 1/8000th of a second to several seconds. Some systems can use up to hours of exposure
When hand holding the camera, its important to make sure the shot is not blurry from camera shake. You should have the shutter set to the “same number” as you lens length. For example, if using a 50mm lens, you want a shutter speed of at least 1/60th of a second. If you’re using a 135mm lens, 1/125th is okay, but 1/250th would be better. I’ve found with digital, because most have a multiplier effect (the sensor is smaller than 35mm film, and effectively make the lens 50 per cent longer) you need to set the shutter accordingly. If using a 50mm lens on a digital SLR, I set the shutter to the half stop of 1/90th or faster.
If you don’t have enough light for the exposure I recommend a sturdy tripod. If you have a questionable speed, you can try bracing yourself against a post, tree, or other stationary object. I never stop from taking the shot even when I’m doubtful, you never know – you might get a great shot anyways.
A light tight box. Holding the lens, shutter and exposure medium, the body of the photo camera keeps light out. On most photo cameras, the body also holds electronics to control the aperture and shutter.
The meter will help you determine the exposure you need. This is not something you can use on all photo cameras – particularly very old SLR’s and most point-and-shoot style photo cameras. The meter may be part of the photo camera’s system, but not have any visible meter for the photographer to use. However, most serious photo cameras do have a display for the meter so you can determine your exposure.
The most important part of the photo camera is the six inches BEHIND the viewfinder (assuming you use the viewfinder, if you normally look at the LCD on the back of your digital camera that would change to about 18 inches.)
A note about Stops. On modern photo cameras, there are numbers for additional fractions of a Stop, which can be either 1/2 Stops or 1/3rd Stops. This makes learning your stops a little more complicated but the principal still works.
Almost everything else on modern cameras is a way to control the focus of the lens, the aperture or the shutter speed. On digital cameras there is one last control which is to set the colour temperature. This will be explained later in another lesson.
If you’re using a modern digital SLR, or a film SLR with a lot of automation on it, I highly recommend you read your photo camera’s manual closely to find out how to do basic control of: setting the photo camera to manual exposure, setting the lens aperture, and setting the shutter speed. These three areas are important for getting the most out of these lessons.
If you are using a pocket photo camera or point-and-shoot style  photo camera, you can set these features on some but not all photo cameras of this type.
information taken from  www.bestphotolessons.com